Speaker Event FAQ
This is your guide to the Airmeet event platform
Step 1: Join Airmeet upon invitation
- Use the invite link provided to you by Inside Practice to enter the Cannalaw Summit Airmeet.
- This link is unique to you as a speaker and only you may log in using this link.
- Please do not share this link with anyone, they shall appear on the Airmeet with your name and details.
- When you click on the specific link shared with you, you will directly enter Cannalaw Airmeet with no signing-in required.
- Provide device permission to grant access to your camera and mic. For technical Instruction kindly click here.
- After entering the event, all speakers can connect 10-15 minutes before your live session on backstage.
Step 2: Go to Session Area
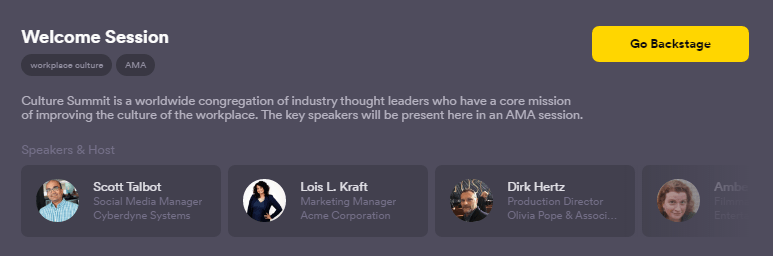
- Once you click on the session icon on LHS, you'll see the event agenda. There will be multiple sessions where you can see the host and speaker’s description. There will be a number indicator to show how many sessions are live as well.
- You will be able to see the Go Backstage button on your mapped session and can join the same by clicking on it.
- Here you can test your audio, video, and devices to avoid last-minute surprises and also interact with the host and other speakers, getting to know them before you go live.
Once everything is in order, the host will choose to begin the session. A countdown of 10 seconds will indicate that the session is about to begin.

Step 3: Commence Session
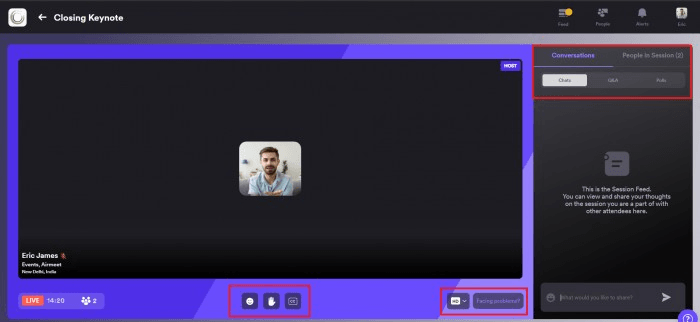
- Once the session has begun you can participate and present your contents. Remember that a Speaker is always visible to all event participants unless you choose to switch off your camera. The buttons to control the Video, Audio and Screen-share appear at the bottom center of your screen.
- All chats, emojis, and questions posed by the attendees will be visible to you. If an attendee uses the “Raise Hand” feature, the host can moderate and accept or dismiss the request. If accepted, the attendee shares the stage with the speakers for the interaction.
Step 4: Session Chat & Q&A
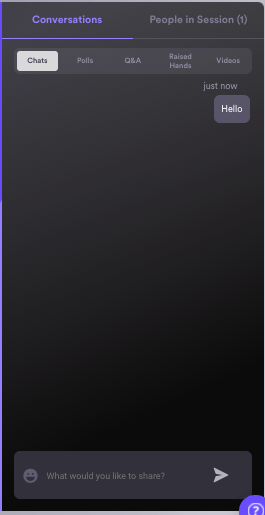
- The ‘Q&A’ button on the right-hand side of your screen lists all the questions asked by the attendees.
- The ‘Feed’ button on the right-hand side of your screen lists common chats initiated by the attendees.
SUPPORT ASSISTANCE
The “Help” button on the bottom right takes you to the Support Lounge and FAQs to assist you in case you face any issues during the Airmeet.

Quick Tips
For a flawless Airmeet experience, do keep the following in mind:
- Please have a stable and good internet connection.
- A noise-free ambiance is conducive to a smooth interaction.
- It is recommended to use a laptop with a Chrome browser.
- Restart the browser to avoid issues (if you face any) due to caching.
- An external and good headset with a mic is recommended, though not mandatory.
- If you have difficulty seeing other speakers’ or the host’s feed, please refresh the page or restart the browser and ensure that you close any other conferencing tool you may have used recently.
Additional Resources: Technical Instruction for Speakers
Presenting on Airmeet
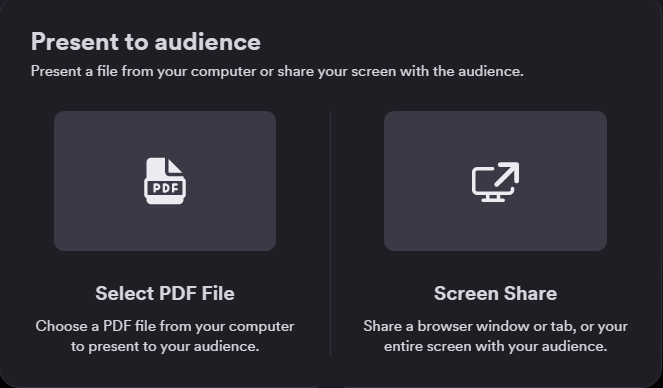
On Stage/Backstage, host/co-host & speaker can share their screen in two ways:
- Present PDF from within Airmeet stage
- Selecting the Screen share option and share “Your Entire Screen”, “Application window”, or “Chrome Tab”.
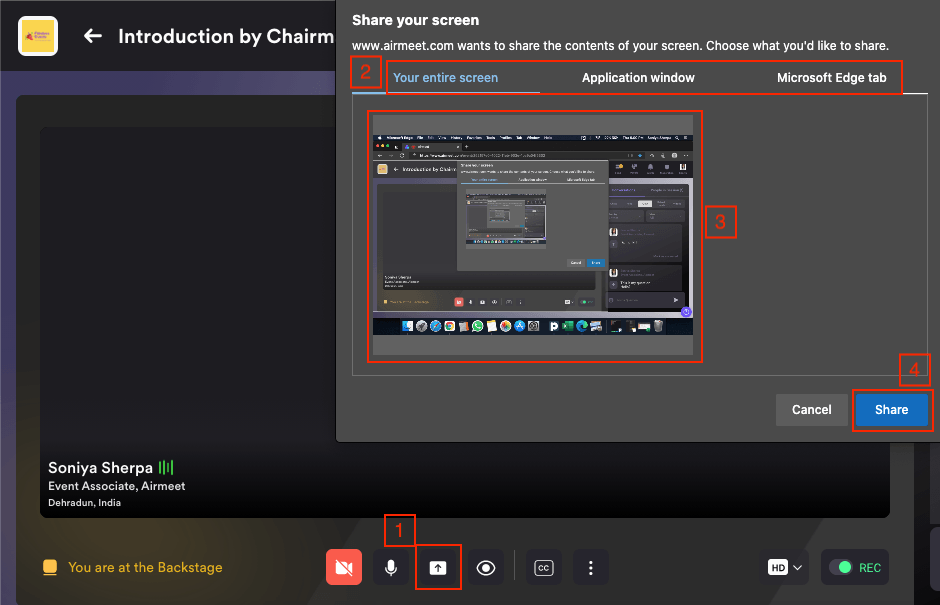
Step 1: Go to the stage/backstage.
Step 2: Click on the upward arrow button and select the share screen option.
Step 3: Choose what you want to share: “Your Entire Screen”, “Application window”, “Chrome Tab”. Then click on the window in the middle and click on the share button once it turns blue.
Step 4: To share a Powerpoint or other document: After following the above steps, go to the PowerPoint page and present it. You will not be able to see the Airmeet screen and the interactive features such as chats, Q&A. The attendee will be able to see what you present.
Step 5: If you have audio in your content don't forget to click on the share audio checkbox located on the right side corner of the share screen dialog box.
Note: If you are using a Mac operating system (MacBook or iMac) you wouldn't get the share audio option while sharing the screen.

Facing an issue while sharing your Screen, kindly refer to Screen Sharing Troubleshooting.
Delegate Event FAQ
This is your guide to the Airmeet event platform
Step 1: Registration
Use the event link provided by the organizers to reach the event landing page. This page will display the event details like title, date, time description, event partners, etc.
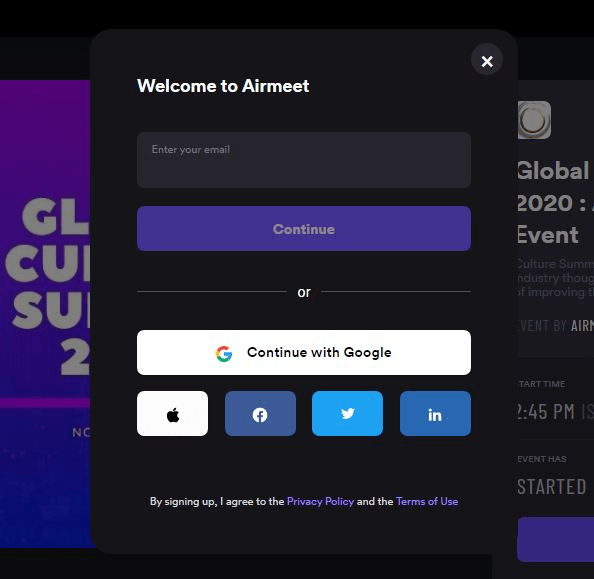
- Click on the “Register for this event” button. You’ll be requested to login using your email or via Google/Apple Id/Facebook/Twitter/LinkedIn.
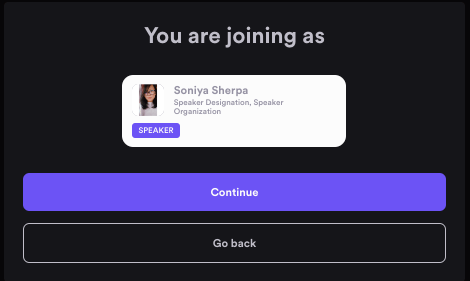
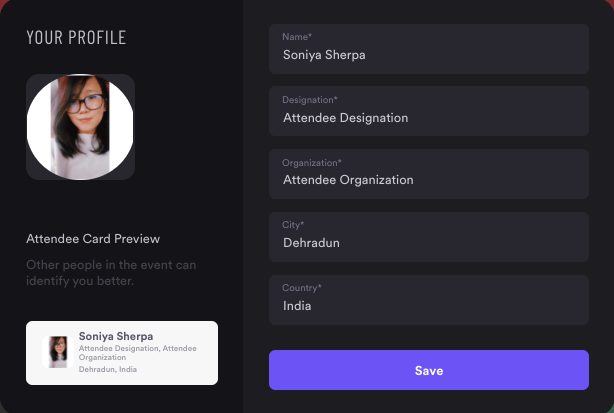
Upon signing up, you will then have to confirm your details. Provide your name, designation, organization, and location details.
- Select “Next” to go to the following screen to check all your details.
- Provide device permission to grant access to your camera and mic. For technical Instruction kindly click here.
- If everything looks good, click “Continue,” and you’re in!
- Don’t forget to block your calendar for the event by clicking on “Add this to my calendar.”
Step 2: Enter Airmeet
- Sign-in is possible only on the day of the event. Use the attendee registration link provided to you, and you’ll land on the event window where you have to click on the “Enter Airmeet” button.
- Log in using your same email id used while registering or by using your preferred social media handle.
- If your Airmeet event is unlisted or stated privately by the organizer, the link provided will act as an authentication itself. You will only be required to fill in your name, organization, and designation details to take you straight to the event.
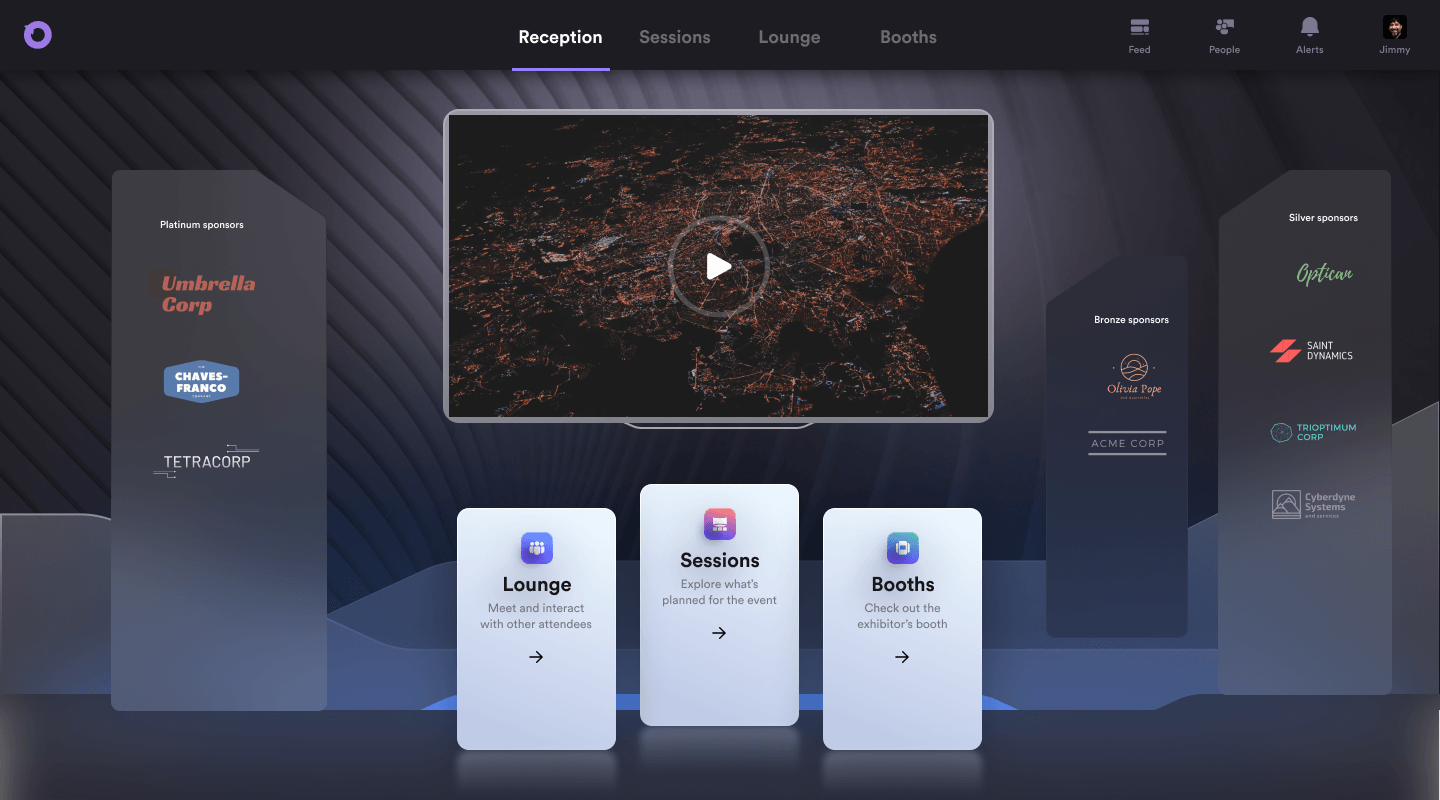
Step 3: Reception
The Reception is the official welcome area for the attendees that contains all the event information in summary. Here, you can see ongoing and live sessions. See the listed event partners and visit their websites. You can also have access to public and private chat.
Step 4: Session
Once you click on the session icon, you'll see the event agenda along with the session agenda, different tags to search for your relevant interest session along with date and time of the event.
There will be multiple sessions where you can see the host and speaker’s description, you can also bookmark the sessions you would like to attend. There will be a number indicator to show how many sessions are live as well.
Interactions during the Session
Prior to the session, you would be able to join the session 1 hour before the session start. A countdown of 10 seconds will be displayed before the session commence.
Once the session begins, You can initiate the following actions while the session is on:
- Raise Hand: If you want to interact with the speaker and the host, you can choose to do so by selecting the “Raise hand” button in the stage’s bottom control bar. If the host accepts your request, you’ll share the stage with the speaker and be visible and audible to all participants.
- Invite to the stage:
The host can invite an attendee to the stage as a speaker. In this case, you will receive a request to become a speaker, and you have complete freedom to “Accept” or “Reject” such requests.
- Ask a question:
You can use the questions section on the RHS to ask questions. We recommend you use this section to ask a question instead of using the general chat.
You can also “Upvote” a question already asked to help hosts pick up questions based on popularity. - React with Emojis: You can quickly react and offer motivation or applause to the speaker using emojis.
- Chat:
This can be public event chat or direct/private chat. All the participants can view the general chat. To have a private chat with a particular participant, hover over their display image on the “Attendees” section in the RHS or a message they have posted—from the hamburger menu, select “Direct message.” Any participant can choose to “Accept” or “Decline” the request for a private chat.
- Report a message: If you come across a message with objectionable content, you can report it to the host.
- Polls: Participate in “Polls” conducted by the host to share your views.
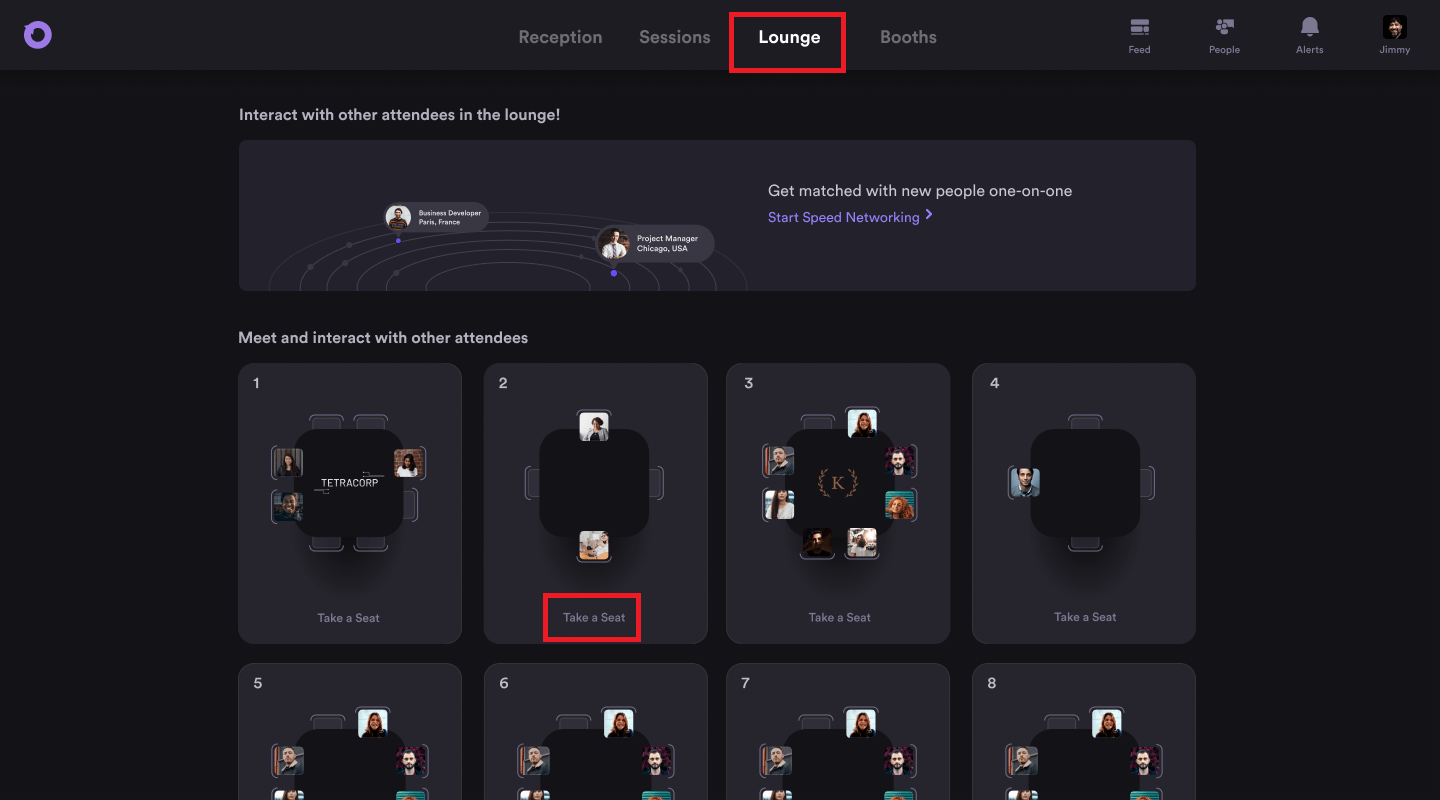
Step 5: Interactions in the Social Lounge
This area allows you to interact with other participants of the event and hop between tables to meet new people and have conversations.
You can experience the following in the Social Lounge:
- Join tables:
Tables may have labels and logos on top of it to signal and inform participants about the conversations happening in specific tables. Typically, an Airmeet virtual table has between two to eight seats each. Once you decide which table you’d like to be seated at, select the “Take a seat” button below the table. If you want to leave the conversation, say bye to the table participants, and click on the “Leave the table” button in the bottom right.
- View profiles:
Click on the display picture of any participant to view their participant profiles.
- Table chat:
You can interact with the other members seated at the table in a virtual mini-conference. You can also have a private table chat. Anyone that joins the table will be able to view the chat in the bottom control bar that will be posted after they join. Once everyone leaves the table, the table conversation will be forever deleted.
- Request increase table size: You can request the host to increase the table size—but remember that a table can only have a maximum of eight seats.
Step 6: Exploring the Booths
The Booths section is an exhibition area, where you can experience multiple exhibitor booths and can enter just by clicking on it.
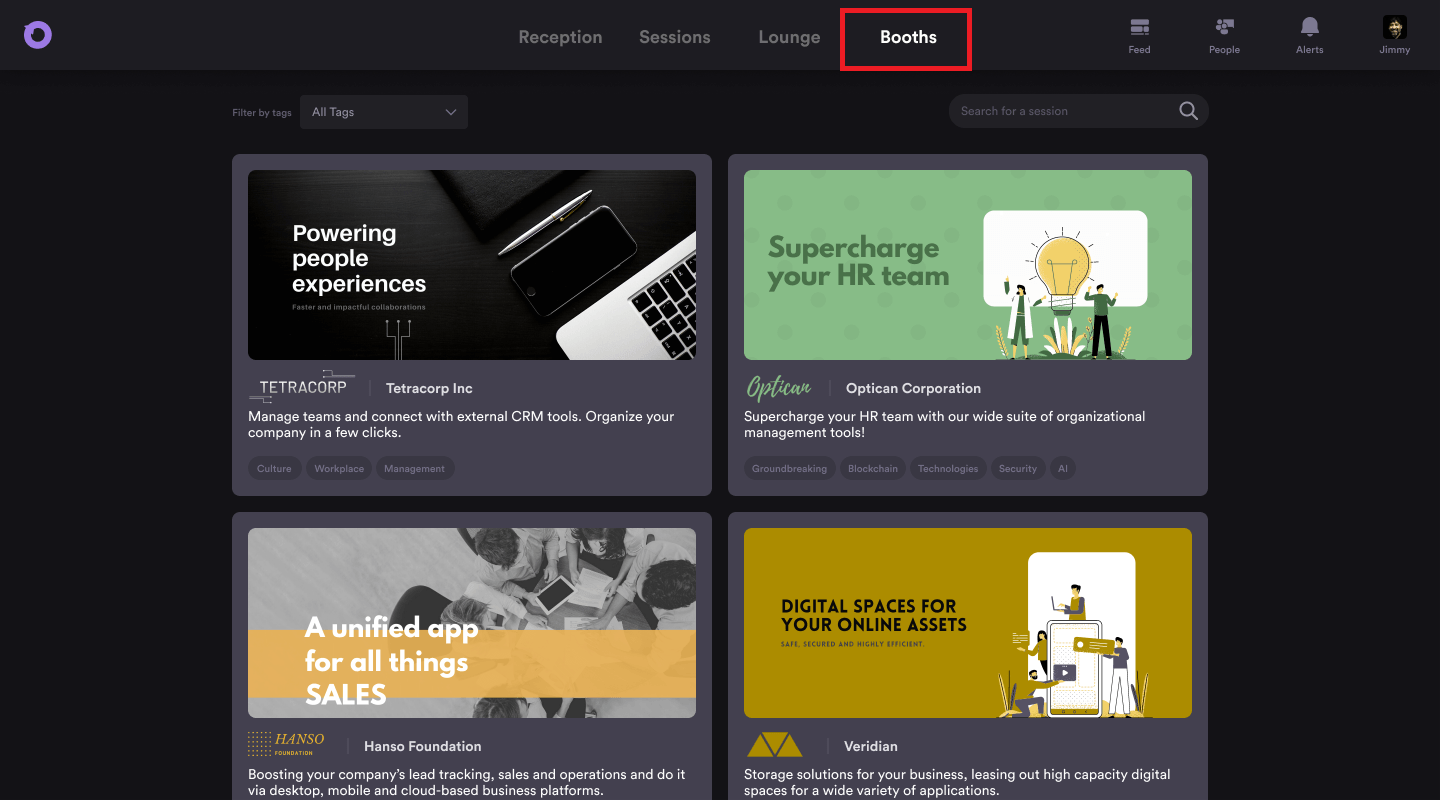
You can catch up with the booth representative in the booth lounge for video chat and discussions, you can also click on the CTA "Register Interest" button to send your contact details to exhibitors.
You can find Exhibitors resources like Marketing Collaterals, Social media plugins & Videos inside the exhibitor booth.

Support
The “Help” button on the bottom right takes you to the 24*7 Support Lounge or Chat support along with FAQs to assist you in case you face any issues during the Airmeet.
Quick Tips:
For a flawless visualizing experience on Airmeet, do keep the following in mind:
- Use a Laptop/Desktop and Google Chrome to join.
- Have a stable and good internet connection
- If you have difficulty seeing the speaker’s feed, refresh the page/restart browser, and ensure that you close any other video conferencing tool you may have used recently.
- If using any VPNs or anti-viruses, please turn them off for a smooth experience.